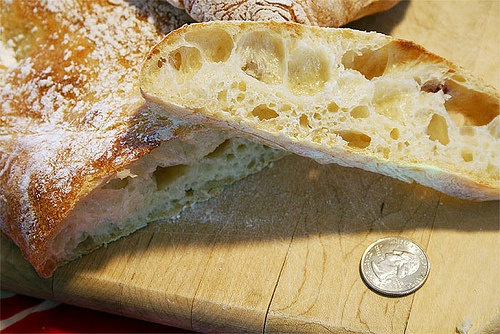
Tuesday, August 15, 2017

Quick Coccodrillo Ciabatta Bread

Ciabatta Bread Ciabatta Bread

500g bread flour 
475g (~2 cups) water
2 tsp. yeast
15g salt
  1. In Kitchen Aid style mixer: Mix all ingredients roughly till combined with paddle, let it rest for 10 minutes.
  2. With the paddle (I prefer the hook to prevent the dough from crawling into the guts of the mixer), beat the living hell out of the batter, it will start out like pancake batter but in anywhere from 10 to 30 minutes it will set up and work like a very sticky dough. if it starts climbing too soon, then switch to the hook. You'll know it's done when it separates from the side of the bowl and starts to climb up your hook/paddle and just coming off the bottom of the bowl. I mean this literally about the climbing, i once didn't pay attention and it climbed up my paddle into the greasy inner workings of the mixer. It was not pretty! Anyway, it will definately pass the windowpane test.
  3. Place into a well oiled container and let it tripleit must triple! For me this takes about 2.5 hours
  4. Empty on to a floured counter (scrape if you must, however you gotta get the gloop out), cut into 3 or 4 peices. Spray with oil and dust with lots o' flour. Let them proof for about 45 minutes, which gives you enough time to crank that oven up to 260 °C.
  5. After 45 minutes or so the loaves should be puffy and wobbly, now it's iron fist, velvet glove time. Pick up and stretch into your final ciabatta shape (~10" oblong rectangle) and flip them upside down (this redistributes the bubbles, so you get even bubbles throughout), and onto parchment or a heavily floured peel. Try to do it in one motion and be gentle, it might look like you've ruined them completely, but the oven spring is immense on these things.
  6. Bake at 260 °C until they are 96 °C in the cnter (about 15-20 minutes), rotating 180 degrees half way through. Some people like to turn the oven down to 232 °C after 10 minutes, but whatever floats your boat. I usually bake in 2 batches.
http://www.thefreshloaf.com/node/2984/jasons-quick-coccodrillo-ciabatta-bread

JIM LAHEY'S NO-KNEAD BREAD RECIPE

INGREDIENTS

  • 3 cups (400 grams) all-purpose or bread flour, plus more for the work surface
  • 1/4 teaspoon (1 gram) instant yeast
  • 1 1/4 teaspoons (8 grams) salt
  • Cornmeal or wheat bran, as needed

DIRECTIONS

  • 1. In a large bowl, stir together the flour, yeast, and salt. Add 1 3/8 cups (320 milliliters) water and mix with a wooden spoon or your hand until you have a wet, sticky dough. This should take roughly 30 seconds. You want it to be really sticky. (Many people who bake this bread find the dough to be unusually wet. Remember that most of the water is meant to be released as steam during baking. Besides, you’ll be handling the dough very little, so you don’t have to worry about your hand looking like some creepy monster that just crawled out of a lagoon.)
  • 2. Cover the dough and bowl with a plate, towel, or plastic wrap and set aside to rest at warm room temperature (but not in direct sunlight) for at least 12 hours and preferably about 18 hours. (Ideally, you want the room to be about 72°F. In the dead of winter, when the dough will tend to rise more slowly, as long as 24 hours may be necessary.) You’ll know the dough is properly fermented and ready because its surface will be dotted with bubbles and take on a darkened appearance. This long, slow fermentation is what yields the bread’s rich flavor.
  • 3. Generously flour your work surface. Use a bowl scraper or rubber spatula to turn the dough onto the surface in one blob. The dough will cling to the bowl in long, thread-like strands and it will be quite loose and sticky. This is exactly what you want. Do not add more flour. Instead use lightly floured hands to gently and quickly lift the edges of the dough in toward the center, effectively folding the dough over onto itself. Nudge and tuck in the edges of the dough to make it round. That’s it. Don’t knead the dough.
  • 4. Generously coat a cotton towel (not terry cloth) with flour, wheat bran, or cornmeal. Place the dough, seam side down, on the towel and dust the surface with a little more flour, bran, or cornmeal. Cover the dough with another cotton towel and let it rise for about 2 hours. When it’s ready, the dough will be more than double in size and will hold the impression of your fingertip when you poke it lightly, making an indentation. If the dough readily springs back when you poke it, let it rise for another 15 minutes.
  • 5. A half hour before the dough is done with its second rise, preheat the oven to 450°F (232°C). Adjust the oven rack to the lower third position and place a 6- to 8-quart heavy pot and its lid (whether cast iron or enamel, Pyrex or ceramic) in the oven as it heats.
  • 6. When the dough is done with its second rise, carefully remove the pot from the oven and uncover it. Also uncover the dough. Lift up the dough and quickly but gently turn it over into the pot, seam side up, being very careful not to touch the pot. The blob of dough may look like a mess, but trust us, everything is O.K. Cover the pot with its lid and bake for 30 minutes.
  • 7. Remove the lid and bake until the loaf is beautifully browned to a deep chestnut color, 15 to 30 minutes more. Use a heatproof spatula or pot holders to carefully lift the bread out of the pot and place it on a wire rack. Don’t slice or tear into it until it has cooled, which usually takes at least an hour.
  • http://leitesculinaria.com/99521/recipes-jim-laheys-no-knead-bread.html